| The "Easy Lid" Cooker | Aquí en Español |
Designed by Chao Tan and Tom Sponheim |
 Although designs for cardboard cookers have gotten simpler,
fitting a lid can still be difficult and time consuming. In this version, a lid is formed
automatically from the outer box.
Although designs for cardboard cookers have gotten simpler,
fitting a lid can still be difficult and time consuming. In this version, a lid is formed
automatically from the outer box.
Making the Base
- Take a large box and cut it in half as shown in Figure 1. Set one half aside to be used
for the lid. The other half becomes the base.

- Fold an extra cardboard piece so that it forms a liner around the inside of the base
(see Figure 2).

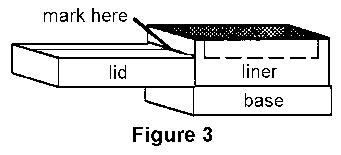
- Use the lid piece as shown in Figure 3 to mark a line around the liner.
- Cut along this line, leaving the four tabs as shown in Figure 4.

- Glue aluminum foil to the inside of the liner and to the bottom of the outer box inside.
- Set a smaller (inner) box into the opening formed by the liner until the flaps of the
smaller box are horizontal and flush with the top of the liner (see Figure 5). Place some
wads of newspaper between the two boxes for support.

- Mark the underside of the flaps of the smaller box using the liner as a guide.
- Fold these flaps down to fit down around the top of the liner and tuck them into the space between the base and the liner (see Figure 6).
- Fold the tabs over and tuck them under the flaps of the inner box so that they obstruct
the holes in the four corners (see Figure 6).

- Now glue these pieces together in their present configuration.
- As the glue is drying, line the inside of the inner box with aluminum foil.
Finishing the Lid
- Measure the width of the walls of the base and use these measurements to calculate where to make the cuts that form the reflector in Figure 7. Only cut on three sides. The reflector is folded up using the fourth side as a hinge.
- Glue plastic or glass in place on the underside of the lid. If you are using glass,
sandwich the glass using extra strips of cardboard. Allow to dry.

- Bend the ends of the wire as shown in Figure 7 and insert these into the corrugations on the lid and on the reflector to prop open the latter.
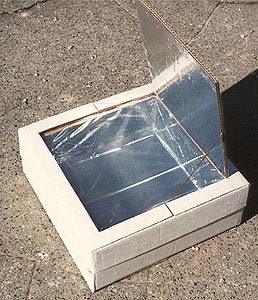
- Paint the sheet metal (or cardboard) piece black and place it into the inside of the oven.
Improving Efficiency
- Glue thin strips of cardboard underneath the sheet metal (or cardboard) piece to elevate it off of the bottom of the oven slightly.
- Cut off the reflector and replace it with one that is as large as (or larger than) the entire lid. This reflects light into the oven more reliably.
- Turn the oven over and open the bottom flaps. Place one foiled cardboard panel into each airspace to divide each into two spaces. The foiled side should face the center of the oven.
For more information contact:
| Solar Cookers
International 1919 21st St., Suite 101 Sacramento, CA 95811 USA |
![]()